 Why create a blog on Blogger.com, because it’s free, easy, and only takes a minute. You can share your thoughts, photos, and more with your friends and the world. Easy to post text, photos, and videos from the web or your mobile phone. Unlimited flexibility to personalize your blog with themes, gadgets, and more.
If you want to create a blog on Blogger.com, here's how to make it:
• Before you create a blog on Blogger.com, you must have a Google account or Gmail account first, so that you can create a blog on Blogger.com, because Blogger.com connected with a Google account. Make a Gmail account first, how can you be seen in the article about Creating an account on Gmail.
• If you have a Gmail account, please go to Blogger.com or Click the image below to create a blog.

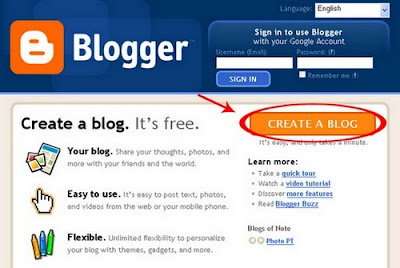
• Next you will go to the Homepage Blogger.com. Click CREATE A BLOG to create a blog for free.
• Then will go to the page Create a Google Account. Fill in these columns.
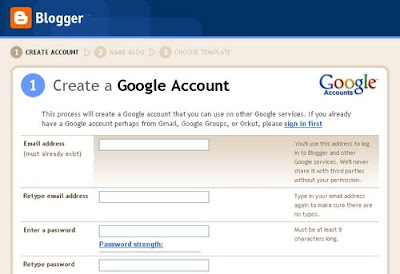

Email address
Enter your email address (Gmail). You'll use this address to log in to Blogger and other Google services.
Retype email address
Type in your email address again to make sure there are no typos.
Enter a password
Enter your password, the same as your gmail password. Must be at least 8 characters long.
Retype password
Type in your password again to make sure there are no typos.
Display name
The name used to sign your blog posts.
Word Verification
Type the characters you see in the picture to the left.
Acceptance of Terms
Check mark, indicate that you have read and understand Blogger's Terms of Service.
If you've filled in all fields, then click CONTINUE.
• Then will go to the page Name your blog. Please fill in the name of your blog you want.
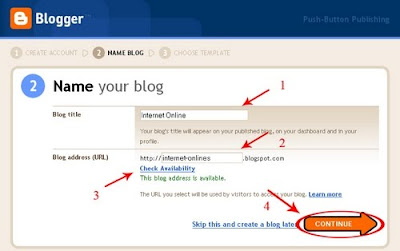
Blog title
Your blog's title will appear on your published blog, on your dashboard and in your profile.
Blog address (URL)
The URL you select will be used by visitors to access your blog. After fill in the URL you want, then click Check Availability to check if the URL you want to use is available.
After filling in all fields, then click CONTINUE.
• After selecting the name of the blog and also a blog url, then will go to the page Choose a template.
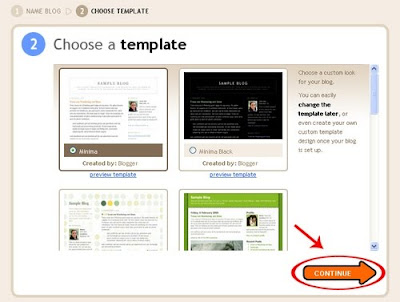
Select the template in any way you want. You can change it later.
When you are done selecting, then click CONTINUE.
• When you are done creating an account, select the name of your blog, blog URL and also the template, then finished already making blog.
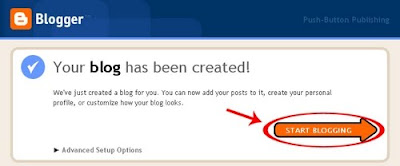
Then click START BLOGGING to use the blog that you created.
• If you have a Gmail account, please go to Blogger.com or Click the image below to create a blog.

• Next you will go to the Homepage Blogger.com. Click CREATE A BLOG to create a blog for free.

• Then will go to the page Create a Google Account. Fill in these columns.


Email address
Enter your email address (Gmail). You'll use this address to log in to Blogger and other Google services.
Retype email address
Type in your email address again to make sure there are no typos.
Enter a password
Enter your password, the same as your gmail password. Must be at least 8 characters long.
Retype password
Type in your password again to make sure there are no typos.
Display name
The name used to sign your blog posts.
Word Verification
Type the characters you see in the picture to the left.
Acceptance of Terms
Check mark, indicate that you have read and understand Blogger's Terms of Service.
If you've filled in all fields, then click CONTINUE.
• Then will go to the page Name your blog. Please fill in the name of your blog you want.

Blog title
Your blog's title will appear on your published blog, on your dashboard and in your profile.
Blog address (URL)
The URL you select will be used by visitors to access your blog. After fill in the URL you want, then click Check Availability to check if the URL you want to use is available.
After filling in all fields, then click CONTINUE.
• After selecting the name of the blog and also a blog url, then will go to the page Choose a template.

Select the template in any way you want. You can change it later.
When you are done selecting, then click CONTINUE.
• When you are done creating an account, select the name of your blog, blog URL and also the template, then finished already making blog.

Then click START BLOGGING to use the blog that you created.
1 comments:
I don’t know how should I give you thanks! I am totally stunned by your article. You saved my time. Thanks a million for sharing this article.
Post a Comment